Tuesday 20 November 2012

Nail it! :)

Hello lovelies!

Polka dots are just too damn cute on the nails so I thought I'd take it for a swing and try it out.

I opted for a bright polka dot gradient tip look. I got a lot of compliments and was even asked where I got my nails done. Yay!

I used pink, orange and yellow and alternated the colors on my nails.
For the dots I used a dotting tool which is super cheap on eBay or you can also use toothpicks which do exactly the same job!

This look will be great for spring/summer.

Ciao lovers xxx

Im Baaaaack !! :) + Sept, Oct, Nov LHI review!

Hello Lovelies !!!

Oh my gosh how long has it been since my last blog post? Waaaaay too long :(

I am so sorry everyone for my absence and lack of motivation these past few months.
There had been a lot of big events the last few months such as my close friends wedding (I was a bridesmaid!) and also a holiday to Bali!
Other than that.................. I must say I got very lazy.

BUT don't fret! I am back and ready to do my best again and bring this blog back to life!

So please forgive me and follow me again once again!

I have accumulated a few Lust Have It boxes since my last blog post which I am late on reviewing but always now than never!

LHI September box
The September Box is filled with great products which are useful to the everyday life.
I actually used the Dermalogica toner while I was in Bali and my friends and I loved this so much!
It is a spray on toner which is light weight and also sinks into the skin fast leaving skin feeling fresh and smooth. Definitely thinking of repurchasing this in the full size.

LHI October Box


The October box had new products which I knew I would love and also products I had not heard of before.
Avene products are always great to receive as they are quite pricey in Australia but are known to be very good products.
The NYX nail polish made me happy since I love nail polishes so being able to receive NYX which isn't widely available in Australia gives me a chance to try out the formulation.
I don't normally wax my legs since I use an epilator but these wax strips will be great for an instant fix.
The bath bomb will be great to use while taking a relaxing bath which I don't normally get to enjoy but this gives me a reason to take a bath!
The product I am most excited for is the Mask in a Cup. All you do is add water into the cup and combine water with the mask powder.
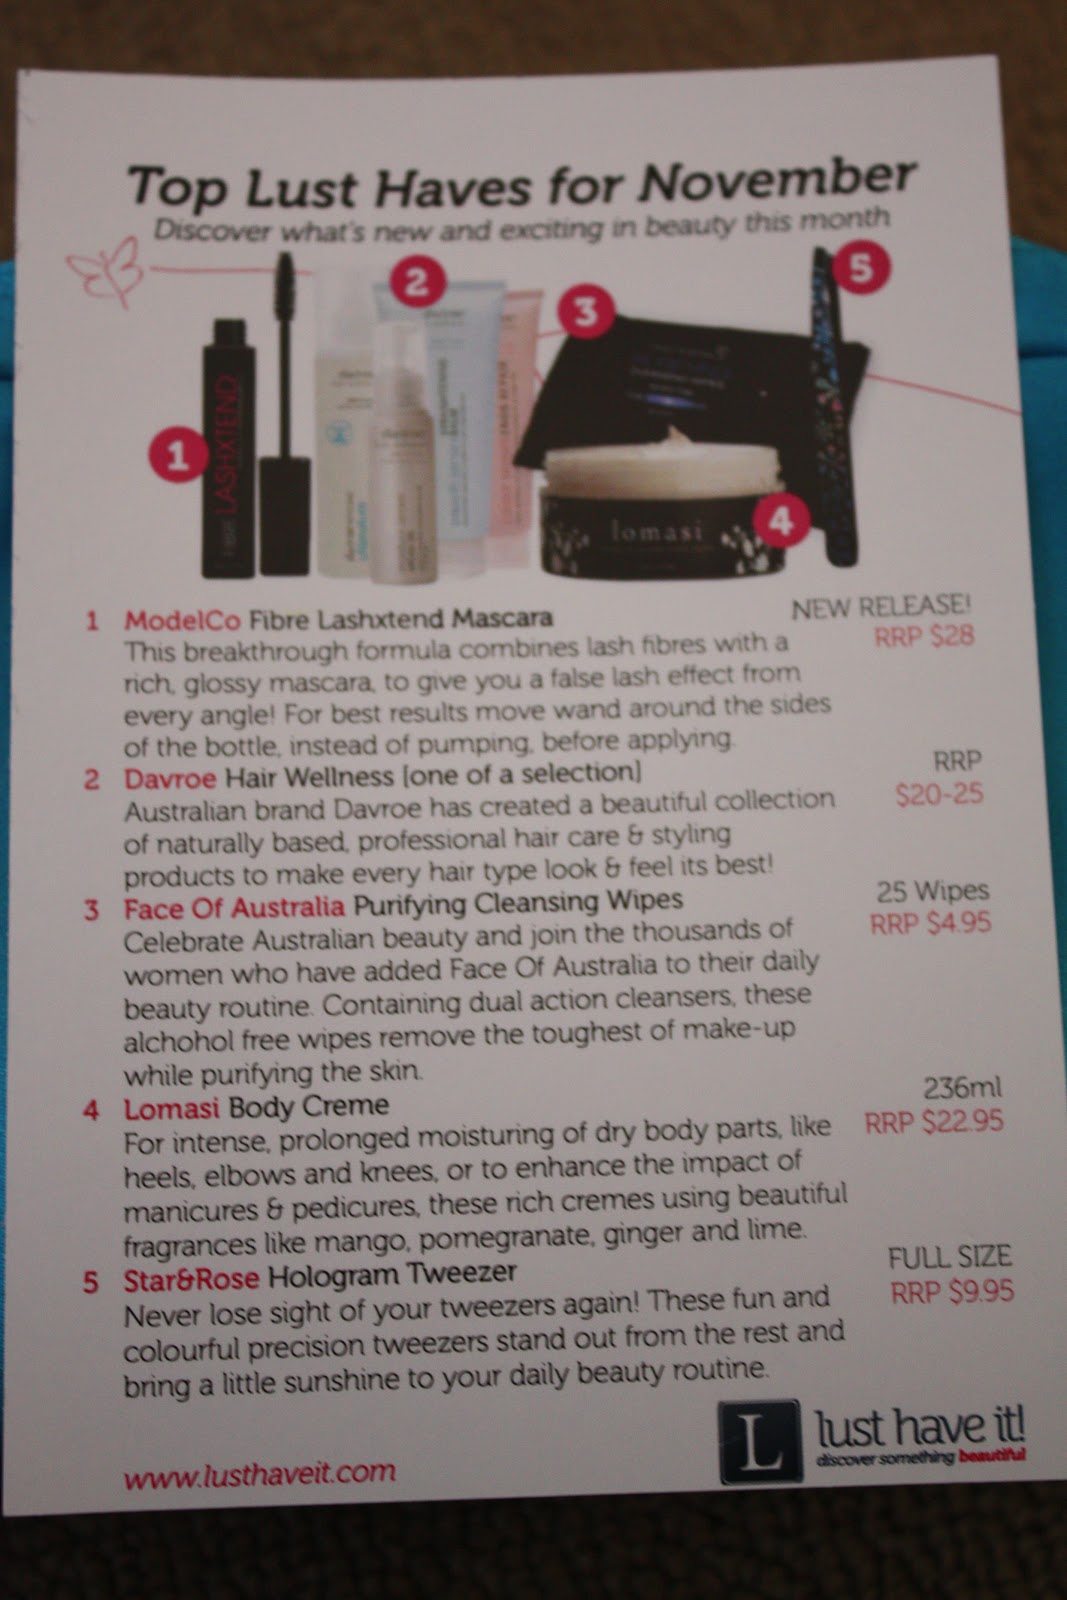
LHI November Box


I JUST received this package not long ago so this is as new as it can get.
I am very eager to try out all these products since they are all staples to any female.
The tweezers are a must have for me since I pluck my eyebrows nearly every day without fail. My friends think I'm crazy but if I go one day without plucking I get very annoyed because I can feel the little hairs growing out. I don't know whether or not I was supposed to receive two or just one but the more the merrier!
The body creme smells divine! I want to eat it! The rich scent of pomegranate melts my heart and makes me want to lather it all over my body. This scent alone will definitely turn heads.
Face of Australia face cleansing wipes claim to wipe even the toughest of makeup which I am struggling to believe. I'll just have to wait and see.
The Davroe argon oil put a smile to my face since I love using hair products to keep my hair in tip top condition. Argon Oils are always on the expensive side and the size of this product is quite decent.
All these products are indeed amazing but the one I am most eager to try out is the ModelCo fiber mascara. I have always wanted to try a fiber mascara but never got my hands on one to try out. This will definitely need a review on its own. I really hope it keeps the curl and doesn't smudge since I only use waterproof due to smudging.

I hope you enjoyed reading my blog post after my long few months of MIA+laziness.
I will be coming back with reviews of a lot of products and heaps of Nail It posts!

Take care! Ciao lovers xx

Tuesday 21 August 2012

Lust Have It! - August

Hello lovelies!

I am so very sorry for the lack of posts these past few weeks.
I have just been so busy with everything and it does not seem like its going to get any better with big things coming up in the next two months with my close friends wedding (I'm a bridesmaid!) and my holiday to Bali! (WOOHOO!!!!!)

Anyways back to the real reason for this post.
It's that time of the month again - LHI box revealing time!
This month is quite different as first of all, the packaging was not the same. No beautiful make up bag but a white box wrapped in a black ribbon. I did not know it was from LHI until I opened it up.
Secondly, it was LHI's first birthday so I had received an extra goody inside which brightened up my day!

So here are the contents


 I am once again impressed with this months box as they have included products which are worth while trying out and using.

The Tigi shine blaster will be used religiously since winter has dried my hair a little.

The Appelles products smell amazing so they will be a delightful treat to use on my body.

The ModelCo black eyeliner is always a useful necessity in any girls makeup collection.

I am very keen to try Marc Jacobs Dot perfume which has yet to be released in Australia.

I was a bit confused with the TanGo cloth since I at least expected a tanning product to go with it but there was no other products remaining. It also claims to be a great makeup removing cloth so I'll try it out since I don't use fake tan.


The last extra surprise were these lovely pearl earrings valued at $80 from Stylerocks.com.
It was very nice for the LHI team to have included such an amazing gift as it shows that they really care and appreciate the support that us subscribers have been giving them. Well done LHI on a great year and many more years ahead!


Ciao lovers xx

Friday 10 August 2012

Nail It! :)

Hello lovelies!

I'm back with another nail it post!

This week I have been sporting the leopard print look which I have been wanting to try for a while.

I didn't realise how easy it was to achieve the look until I actually tried it and my gosh its easy.
I used red and silver accent colours and put leopard details on my middle finger only.

Leopard prints are very easy to do. Just roughly dot your nail with any colour and get a different colour and use a dotting tool or tooth pick and draw brackets around each dot. The aim is not to get perfect shapes so just it with ease. 

Ciao lovers xx

Wednesday 8 August 2012

Nail It! :)

Hello lovelies!

After trying so hard to get good designs onto my nails from the stamping kit I purchased recently, I had given up trying to do it on my left hand.

So I opted for a quick and easy gradient look instead.

Products used:
Base Coat: Essie Ridge filler base coat
Colours for gradient nails: Models Prefer Tall Poppy, Show Off
Top coat: Essie Super Duper top coat
Makeup Sponge

I used a bright apple red and orange and created a nice sunset/sunrise gradient look.
As I showed in my previous gradient tutorial it is so simple anyone can do it without breaking a sweat.

I just love this effect that I'm planning to do this with all the colours I own.

Ciao lovers xx

Sunday 5 August 2012

Battle of the products: Cream shadows! Part 2

 Part 1 can be found here!


Benefit Creaseless cream shadows were bought at an online site which had Benefit products for sale. I purchased a cream shadow in Slippin & Dippin since it was the only colour being offered.
I enjoy using this product a lot as the pigmentation is a lot stronger than the MAC Rubenesque shadow.
It is more on the golden side and works as a great base to act as an underlying sheen to the lids.
Since my skin tone has yellow undertones, these sorts of shadows don't show up strongly on the skin therefore rather than a colour on its own I use it as a base.
The product itself is creamy and smooth, making it easy to work with and it spreads evenly on the lids.


Last but not least, the new craze of cream shadows by Maybelline has hit the shelves of Australia.
These are set to be the best in the lower price market that will do exactly the same job as high end products.
My verdict? Maybelline you are awesome.
These cream shadows blew me away when I received it from a friend who recently went to America.
Out of the colours that I wanted the most, she could only get her hands on two colours.

I received Bold Gold and Tough as Taupe. I really wanted Bad to the Bronze but it was apparently sold out everywhere so I decided to get it here but it is also sold out everywhere.

First of all the packaging is very sturdy. It is contained in a glass jar just like MAC and Benefit and holds a substantial amount of product.

Bold Gold is a little bit of a let down but is still very good quality. It blends well and if you wanted a subtle wash of gold shimmer on your lids this will do the trick. Since it is a cream shadow it will last on you all day unlike powder shadows. I personally like bold colours therefore I top it off with a gold powder shadow.

Tough as Taupe can be a bit intimidating for some people since it is a matte greyish colour that is quite pigmented. A little goes a long way and once you get the hang of blending it out, the finish is very natural.


If I was to choose which brand I like the best to worst I would have to choose Maybelline as the best because you cannot beat the price and it works so well. Worst would have to be Make up Forever since the formulation is quite hard to work with. The only upside to the product is that it is a waterproof formula so it would be great to use if your on a holiday.


I think cream shadows are a great way to keep your makeup looking fresh, bold and long lasting throughout the day. I will never do an eye look without using a cream shadows ever again.


Do you use cream shadows? If so which ones do you own?


Ciao lovers xx

Sunday 29 July 2012

Battle of the products: Cream Eyeshadows! Part 1

Hello lovelies!

As you can see from the title, this post is going to be about cream shadows.
Cream shadows have been a huge hit the past few years as it a product that can be used many different ways. They are shadows which are made into a cream formula so unlike powder shadows they last a lot longer and can combat a lot better with facial oil and normal daily life. Just a swipe of cream shadow on to the lids and it can be a colour on its own or you can put powder shadows on top for a more intense look.

Over the past year or two I have made a small collection of cream shadows which I use all the time.
I don't have a huge range of colours but I am planning to increase my stash as these have become a staple in my everyday life. 

I use cream shadows mostly as a base so my eye look can last the whole day and also using them makes the shadows look more vibrant and crisp.


Tuesday 24 July 2012

Lust Have It!-July

Hello lovelies!

Finally Lust Have It's July box has arrived on my bed ready to give you my first impression.

My first impression? Very pleased compared to last months which was an utter failure which other LHI members also agreed to.
They must have realised that they had disappointed quite a number of people and stepped up their game to impress us again.

This months bag is a bright orange which brightened up my mood (since I'm sick with a cold in bed) and at first feel I could feel that it was jam packed with a lot of goodies to try.

So what exactly is in this months bag you ask? Lets open it up and see.


Nail It! :)

Hello lovelies!

There has been so many different nail art designs that I wanted to try out but I have just been busy with useless things.

Another quick post on the design that I have on at the moment.

I recently purchased a nail art stamping kit online so I decided to give it a go as soon as I received it.
The good thing about it was that I can use any polish that I own and it doesn't need to be specifically made for nail stamping.


Products used
Base coat: Essie protein base coat
Base nail colour: Butter London Yummy Mummy
Stamping colous used: Models Prefer Sprinkling Violet, Love to Shop, Role Model
Top coat: Essie super duper top coat
Rhinestones from eBay.


I used a few of the floral designs to stamp onto the nails.
I already have a few Konad plates which are easy to use but my gosh are these ones hard.
I don't know if its the plates that are bad or the fact that I am using polishes that are too thin to use for stamping.
Either way it took me ages to get a clear image stamped on to the nails.

I also decided to add some rhinestones to give the design some bling. 

Konad plates seem to be the best plates out there but they are just so expensive.
I hope to find cheaper alternatives that are easy to use with normal polishes.

Ciao lovers xx

Monday 23 July 2012

Nail It! :)

Hello lovelies!

Another quick and simple nail it post!
This is the second polish I got from the US thanks to my lovely friend.

Uh oh roll down the windows.


This deep medium dark moss green is creamy and opaque in just two layers.
The color reminds me of army and combat colours and at first I regretted getting this polish, but the more I see it the more I seem to like it. It definitely won't be a color everyone else will like.

Ciao lovers xx

Monday 16 July 2012

Review It! :)

Hello lovelies!

Don't you just hate it when you spend time in the morning making yourself all pretty and flawless to end up realising that by the end of the day most of your makeup has disappeared? I certainly do.
I want my makeup to stay put all day and all night until I take it off at the end of the day.

The two products I will be reviewing are makeup finishing sprays.
- Australis Makeup Finishing Spritz (~$10)
- MAC Fix+ (~$30)


There are a few reasons why you would use a finishing spray.
1. To set your makeup for that final flawless finish
2. To set your makeup to keep it last longer
3. Keep your skin and makeup looking fresh throughout the day

 Australis Makeup Finishing Spritz
I have always been interested in finishing sprays and wanted to try out the Urban Decay All Nighter Long Lasting Setting Spray but of course its hard to get in Australia unless you buy it overseas.
This seemed like a great alternative and at a cheaper and affordable price too.
At first I regretted buying this product as I couldn't get used to the floral lavender fragrance since I really don't like anything that smells like lavender.
Disregarding the scent, the product itself worked very well. It sprayed evenly on the face and dried to a finish where it actually felt like the makeup had a protective shield over it.
It also added a bit of moisture to the skin helping it feel softer.
I have just run out of this product which lasted me a very long time and I will definitely repurchase it again.

MAC Fix+
This product is a beauty cult within the makeup community. I think anyone who is into makeup would have tried or purchased this product.
It is what the name says it is. It fixes the makeup to the skin and helps keep the makeup stay put and look flawless.
Unlike the Australis spray, the Fix+ has a subtle fragrance that was not at all overwhelming.
It sprays a fine mist and dries very quickly giving it a quick fix. If I had a small spray bottle I would carry it around with me and spray it throughout the day just to give myself a bit of a fresh lift.

Both products work just as well and are quite comparable.
If the Australis spray fixed the scent then it would be the perfect spray I will place this as my HG(holy grail) product.

Do you guys use a finishing spray? If so which one?

Ciao lovers xx

Wednesday 11 July 2012

Nail It! :)

Hello lovelies!

Just a quick and simple nail it post showing off my new polish I received from my friend while she was in USA. I cannot remember where I saw a swatch of this polish but I was hooked on it and couldn't wait to get it.


I eat mainely lobster is a beautiful creamy pinkish, coral red with a golden sheen. The gold looks like ever so tiny glitters which you would easily missed when not looking at the polish close up.
I wore this polish yesterday with my ASOS skirt which I got from my haul a while back and the colour match is pretty identical from afar.

Ciao lovers xx

Sunday 8 July 2012

Skin Care Routine - Night

Hello lovelies!

Just like my day time skin care routine, my night time skin care routine is just as simple.
I just cannot be bothered standing around putting layer upon layer of products which really... who knows if its really that beneficial?

Saturday 30 June 2012

Nail It! :)

 Hello lovelies!

Wow it seems like its been ages since I did a Nail It post.
I guess that is because of the nail strips that I applied on around two weeks ago. Yep that's right! It lasted a whopping TWO weeks. I was very impressed.
Yes there was the wear and tear on the tips but it was mostly still intact and looked good enough to keep on for so long.

I finally got sick of the design and had to take it off.
This time I opted for a gradient effect which a lot of people seem to be doing these days.
Since it is winter here in Australia I went for a less brighter look and used mossy grey greens to achieve the look.

Products used
Essie Polish - Topless and Barefoot, Da Bush, Sew Psyched
Essie Protein base coat
Sally Hansen Instadry top coat
makeup sponge
cotton tip
Manicare nail polish remover


Steps
1. Apply base coat to protect your nails
2. Using a rectangle cut out sponge apply nail polish straight onto the sponge in colour order lightest to darkest.
3. Dap the sponge onto the nail lightly back and forth
4. Continue to reapply polish to sponge and dab onto nails until you are pleased with the outcome.
5. Apply top coat to blend all colours and finish off with a great shine.
6. Clean the edges of fingers with a cotton tip dipped in nail polish remover.


As you can see in the first photo I changed the colour direction creating darkest to lightest instead of lightest to darkest.
You can create an amazing array of different colours and designs by changing the angle of how you dab it. You have the traditional gradient from end to tip, or you can go side to side or diagonally.

I think I will be hooked on this look for quite some time.

Ciao lovers.


Thursday 28 June 2012

Skin care routine - Day

Hello lovelies.

Winter is giving me a hard time this year with dry skin and lips that is constantly screaming for moisture.
I also recently had a bit of a bad skin breakout where my face feels like a mandarin. GROSS.

I have normal to combination skin where my T-zone can get a bit oily but nothing excessive. My skin in general is pretty clean other than the odd spot here and there.

I am not someone who has a routine or sticks by one because frankly I cannot be bothered sitting there layering product after product. I follow the simple cleanse, tone, moisturise. Thats it.

So let me start off with my morning routine.
1. Wash face without any products, just water. I do not see the need to cleanse with any form of cleansers in the morning since its not like I am rubbing my face in anything dirty after my night routine.

2. Toner. At the moment I use the Body Shop Seaweed Clarifying Toner dabbed on a cotton pad and wiped all over the face to fix my moisture level on the skin.

3. Day moisturiser. I am using Lancome Hydrationist. This product is light weight, smells refreshing and sinks into the skin very fast.

4. Suncream. I either use the Face Shop natural Triple Action Sun Cream or my Vitazing tinted moisturiser. If I am applying foundation I will use the Makeup Forever UV Prime SPF 50 PA +++. You always need to protect the skin with your daily SPF. Even if the weather is gloomy I do not miss this step. 

5. Make up. I try not to leave the house without makeup. Even if its minimal.

6. Make up setting spray. At the moment I am alternating between my Australis Makeup Finishing Spritz and MAC Fix Plus. I feel this locks in my makeup into my skin and also gives me the final spritz of moisture.


See. There's not much to my morning routine. I can be ready and out in 10 minutes. (although this depends where I'm headed for the day. If i need more attention to my make up it can take up to 30 minutes. If its just to work than 10 minutes max)
How long does it take you in the morning to get ready?!


Wednesday 20 June 2012

Lust Have It! - June

 It is that time of the month again... LHI time!

But first of all can I say... I am a little disappointed with this months package.
As soon as I got home from work the box was sitting on my box which brightened up my mood after a long day of work but ......... it felt rather light?!

I didn't want to jump to conclusions so I opened the package straight away but alas..my instincts were correct. I know its about samples and trying out new products but this bag was by far the worst one I have received.

The contents consists of
- LonVitalite-24k Active Golden Yulan Oil Facial Mask
- LonVitalite-23k Active Gold Full Eye Mask
- Batiste dry shampoo in Blush
- Marc Jacobs Lola perfume sample
- Roberto Cavalli perfume sample
- Bloom glitter eye liner in silver

So I was happy to receive the batiste dry shampoo since I already use this particular brand and quite like it. It is infused with a scent to give a normal dry shampoo a twist.

I'm excited to use the face and eye masks since I have just started to get into the whole sheet mask hype and this is infused with gold! oooo lala. I'll feel a million dollars.. well hopefully.


I already own a glitter eye liner so I wasn't too excited for this product. If it came in a different colour than maybe it would have interested me but alas. Now I own two silver glitter eye liners.

The last samples were perfume samples. There was 2 samples from 4 you would have received but just my luck I get the ones I don't want or fancy. I really like the Mark Jacobs Daisy line but nooooooooo I had to get the other ones. Sigh.


Why do I have such bad luck when it comes to lucky dips? Never do I win anything or get what I want :(
O.K I'll stop my annoyed rant.
Once again I'll be posting up reviews of these products one by one. 

Anyways, I hope LHI becomes a bit more personalised so I get things I actually am interested in.

Ciao lovers xx